Magos
Shantotto Fanboy
For those of you that can't access BG, here is all the Salavge info I've found for Bhaflau Remnants. Please feel free to add info that you might find pertinent. Enjoy ")
Strategy
I have posted the source material for this summary in my LJ here: Salvage - Bhaflau Remnants - LBC Defeated. This link contains a lot of detail that I didn't put into this post.
1. On 1st Floor, used West Route.
2. Farmed Bifrons first for weapons and then wamouracampa for armor slots.
3. Pulled Trolls for weapons and HP
4. Pulled wandering wamoura for magic and JAs.
5. Returned to wamouracampas for more armor slots.
We did not attempt mad bomber or any other NMs on this floor.
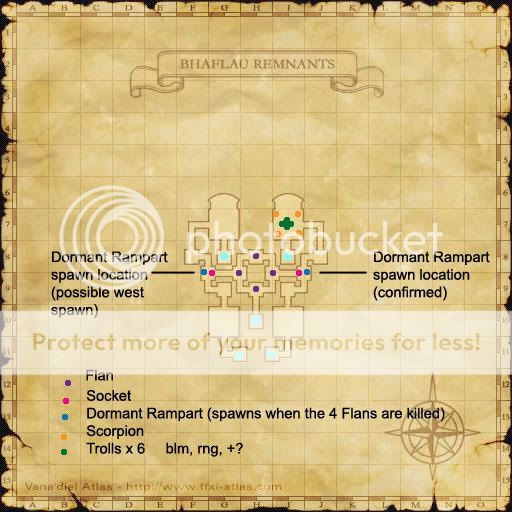
6. On 2nd Floor, pulled all four flans.
7. Went East to scorpions and the troll ironworker (I think we went south east, but I can't be sure -edited 12/27)
We did not attempt any NMs on this floor.
** Please note this before porting up: (added 12/27)
<TABLE cellSpacing=1 cellPadding=3 width="90%" align=center border=0><TBODY><TR><TD>Gwynplaine wrote:</TD></TR><TR><TD class=quote>In order to get to the black pudding room on floor 3 I think you need to take one of the south teleports from floor 2. Pudding room is at H-9 so its only accessible from the south.</TD></TR></TBODY></TABLE>
8. On 3rd Floor, invised to the big room at H9 with Black Pudding. Killed them all for more magic, HP, weapon, and max MP cells.
We did not attempt any NMs on this floor.
9. On 4th Floor, buffed and chilled while one person went to activate the teleporter.
We did not attempt anything on this floor.
10. LBC Floor.
-----------------------------------------------
# Party Setup
Party 1: BRD , BLM , WHM , BLM , SAM/THF , BLM
Party 2: WHM , RDM , PLD/NIN , NIN
Party 3: WHM , RDM , MNK , RNG , BL
-----------------------------------------------
# LBC Fight
PLD to his left, NIN to his right.
BRD and SAM only come close when they need to.
RNG is behind them standing on the platform.
Everyone else is standing near the Gilded Doors.
1. Stun works against Homing Missile. Have rotation set up like at Cerberus.
2. Try to save those r/e/t items like dusty and those stat drinks for LBC. They come in handy since they don't have any med effect.
3. I think everyone had max HP, body, hands, legs, feet, and weapon (even the mages). Magic-users and NINs all had Magic, max MP. Melees/Tanks had sub job and JAs.
SAM average melee hit was 53.
RNG ranged attacks average around 60-80 and critical up to 120.
PLD and NIN melee attacks were negligable (averaged around 15-25).
====================================================
Did a run last night, not sure if any of it would be helpful to anyone but I'll give a rundown for example's sake.
Took West path first, killing bombs first for weapons. Some advice... we had two thieves this time around, and we were getting 2-3 weapon drops per bomb. TH rocks the place. This meant that we were fully weaponed after only a couple of bombs, and took out the rest of the floor way faster.
Took out wamouras for armor, as many as we could kill quickly on the way, and then did some trolls and flyers for magic, abilities, and subs. On these you'll probably get more weapons; because of how many were dropping, we were down to giving our mages staves at this point.
Second floor, we killed the 4 Flans, then rushed out the East exit and went south. Killed room with 6 scorps and 2 trolls for a ton of stat boosters, then did a couple more scorpions in the next room while I rushed for the teleporter.
Third floor, we killed a couple of the Flans, and then I ran ahead to the teleporter while the group kept killing. They took down 2-3 more by the time I got there, and by then everyone that could use magic had it.
This is where I may have made a mistake. On the 4th floor, we only killed 1 Archaic Gear and 2 Archaic Gears (the triple gears). I'd heard that these weaken the boss. At this point, being a NIN, I 25%'d my ass past the Archaic Chariot and his gear friends, who chased me and did not warp. I saw earlier that someone with a Bhaflau card approached some and they warped; I had one, and everything I agroed on the 3rd floor warped on me. You need to act on it before it agros, basically. On the 4th floor, however, stuff chased me. Funny thing though, I had only Sneak on, and the gear that agroed me didn't do so until I had passed it and almost gone north into the next room. Either it's a very delayed true-sound agro, or it's some kind of sight agro, or something else entirely. In any case, I outran the whole mess while my group took out one more (single) gear and recovered. We didn't kill any of the Archaic Chariots.
5th floor, we engaged the boss with groups as follows:
PLD/NIN NIN WHM RDM BRD BLM
SAM/RNG RNG DRG THF
MNK WAR DRK BLM THF
So we went in with 16 people. All I can say is, the thing is brutal. My initial thought was to kite, but the PLD didn't have 12%, and it was 8:00 game time so we didn't have time to wait for night for me to kite. We tried having the RNG and SAM/RNG peck away at it while BLMs nuked lightly and the THFs sata'd back and forth. TA+WS was doing Jorm-type damage, and not sticking much hate on us. We stunned a couple of Homing Missiles, but he also resisted a lot of stuns, and the BLMs got too much hate to nuke much. We got it to 84% before he went nuts with the Homing Missile spam.
One thing, people have probably noticed it, Homing Missile doesn't appear to kill. One left two members of the alliance at 1 and 4 hp, respectively. When people had less HP, it did less damage. Highest one I got hit with did over 900, lowest was under 400. Also, his regular hits were very, very erratic, anywhere from 120 to crits close to 500. I didn't notice any difference between side-arm tanking him and straight-on tanking in terms of damage taken. Crits on mages were close to 900.
As for melee, toward the end when we didn't really have much chance left I tried with katanas, and was doing 10-20 with crits in the 40 range. Sidewinders were doing 200-400. SAM 2hr did 3 Sidewinders for 600 total. He did it for fun from 100%, and I Mijin'd for another 200, and that all totaled took him down to 97%. So 800 damage = about 3% in terms of his max HP. Chi Blast was doing good damage, but the hate-holding potential wasn't there with just a PLD/NIN and NIN. Could be easier if we did more than 2-3 voke/flash rounds next time.
In truth, we could have held him all day, but we only had about 20 minutes. We could have fought him Ultima-style but we didn't have enough TA action to keep hate, since the regular THF SATA was doing 150-200 tops. Next time we'll probably bring a couple of SAM/THF and set up some fat skillchains for MB. Biggest constraint I can see, though, is the time. In 10 minutes of trying different methods, and evenutally trying 2hrs, we only took him down to 84%. Our ranged attacks were feeding him way too much TP, and he had already used 4-5 ws's by 95%. I'm not sure how well kiting would work, but since it's been confirmed you can outrun Homing Missile, timing it so your last 30 minutes were during nighttime might let a NIN kite efficiently. But then I don't know if enough damage could be done in the time allotted.
In any case, it was too hard for us to beat on our first try. We'll be trying again soon, and if anyone has any more input/questions about specifics, please ask.
There really has to be SOME way to weaken him, because as it is he's extremely hard to kill. I'm hoping we can confirm something soon.
=========================================================================
________________________________________________________________
# Cell Drop List
-- Enter 1st Floor @ 09:01 --
@ Bifrons 09:04 (H-10)
Incus (Weapon)
@ Bifrons 09:05 (G-9)
Incus (Weapon), Duplicatus (SJ), 2x Spissatus (MP)
@ Bifrons 09:07 (G-9)
Incus (Weapon), 2x Duplicatus (SJ), 2x Humilus (HP)
@ Bifrons 09:10 (G-8)
Duplicatus (SJ), Spissatus (MP)
@ Troll Lapardist 09:12 (G-7, four wall room)
no drops
@ Bifrons 09:13 (G-7, big room)
2x Humilus (HP)
@ Troll Lapardist 09:12 (G-7, big room)
no drops
@ Bifrons 09:16 (G-7, big room)
Incus (Weapon), Duplicatus (SJ), 2x Humilus (HP)
@ W.Wamoura 09:18 (H-8)
2x Opacus (JA), Praecipitatio (Magic)
@ W.Wamoura 09:21 (H-8)
Opacus (JA), Praecipitatio (Magic)
@ W.Wamoura 09:22 (H-8)
3x Opacus (JA), Praecipitatio (Magic)
@ Troll Ironworker 09:24 (H-8)
Duplicatus (SJ)
@ Troll Ironworker 09:25 (H-8)
2x Humilus (HP)
@ Wamouracampa 09:27 (G-7, big room)
3x Stratus (Leg/Feet), 3x CirroCumulus (Back/Waist), 2 Virga (Ear/Ring)
@ Wamouracampa 09:28 (G-7, big room)
3x Castellanus (Head/Neck), 3x Cumulus (Body), 2x Undulatus (Ranged/Ammo)
@ Wamouracampa 09:30 (G-7, big room)
3x Castellanus (Head/Neck), Virga (Ear/Ring), 3x Radiatus (Hand)
@ Wamouracampa 09:32 (G-7, big room)
2x Undulatus (Ranged/Ammo), Castellanus (Head/Neck), 3x Stratus (Leg/Feet)
@ Wamouracampa 09:32 (G-7, big room)
2x Stratus (Leg/Feet), 4x Castellanus (Head/Neck)
@ Wamouracampa 09:33 (G-7, big room)
3x CirroCumulus (Back/Waist), 3x Virga (Ear/Ring), 2x Stratus (Leg/Feet)
@ Wamouracampa 09:35 (G-7, four wall room)
3x Castellanus (Head/Neck), 2x Virga (Ear/Ring), 3x CirroCumulus (Back/Waist)
@ Wamouracampa 09:36 (G-7, four wall room)
3x CirroCumulus (Back/Waist), 2x Undulatus (Ranged/Ammo), Cumulus (Body)
@ Wamouracampa 09:37 (G-7, four wall room)
2x Virga (Ear/Ring), 6x Stratus (Leg/Feet)
-- Port to 2nd Floor @ 09:38 --
@ E.Flan 09:40 (H-8/H-9 Ring)
Praecipitatio (Magic), Opacus (JA)
@ E.Flan 09:41 (H-8/H-9 Ring)
Praecipitatio (Magic), Opacus (JA)
@ E.Flan 09:43 (H-8/H-9 Ring)
Praecipitatio (Magic), 2x Opacus (JA)
@ E.Flan 09:44 (H-8/H-9 Ring)
Praecipitatio (Magic), 2x Opacus (JA)
@ Flux Flan 09:48 (I-9, NorthEast corner room, Socket)
** Traded Spissatus, Got 2x Spissatus (MP)
@ Troll Smelter 09:49 (I-9, room in center)
Humilus (HP), 2x Mediocris (CHR)
@ Sulfur Scorpion 09:51 (I-9, room in center)
3x Pannus (STR)
@ Sulfur Scorpion 09:52 (I-9, room in center)
3x Mediocris (CHR), Pannus (STR)
@ Sulfur Scorpion 09:53 (I-9, room in center)
Pannus (STR), 2x Pileus (MND)
@ Sulfur Scorpion 09:56 (I-9, room in center)
2x Pileus (MND), Humilus (HP)
@ Sulfur Scorpion 09:56 (I-9, room in center)
2x Pannus (STR), Incus (Weapon)
@ Sulfur Scorpion 09:57 (I-10)
Incus (Weapon), 3x Radiatus (Hand)
@ Sulfur Scorpion 09:58 (I-10)
Incus (Weapon), 3x Virga (Ear/Ring)
-- Port to 3rd Floor @ 10:00 --
@ Black Pudding 10:04 (H-9)
Humilus (HP), 3x Undulatus (Ranged/Ammo)
@ Black Pudding 10:04 (H-9)
Praecipitatio (Magic), Spissatus (MP)
@ Black Pudding 10:07 (H-9)
2x Humilus (HP), 2x Duplicatus (SJ)
@ Black Pudding 10:07 (H-9)
2x Praecipitatio (Magic), Spissatus (MP)
** One of us ran to the porter at J-9 to port us up.
-- Port to 4th Floor @ 10:09 --
-- Port to 5th Floor @ 10:15 --
________________________________________________________________
# Comments about our LBC fight
Hevada used an Oracle's Drink and his damage was significantly higher than anything else including the other BLMs. Note: He also had INT stat encumbrance since we couldn't get any Velum cells to drop at all in this run. Once he KO'd and RR'd, his damage output reflected his encumbered status.
PLD used Body Boost.
NIN used Body Boost.
RNG was doing his normal damage just like last time.
MNK chi-blast doing less than last time. I wonder if he even used the MND item. (He's not our usual galka MNK unfortuntely.)
Stun. We rarely used it this time. Also, LBC did not spam Homing Missile.
Healers. Please bring some raven/crow for casting cures after Homing Missile.
________________________________________________________________
# Observations
1. The drops were different from our last few runs. They included way too many STR cells and no INT cells at all even though we went the exact same route as before. This is what, ultimately, lead to our running out of time against LBC.
2. There were a few mobs that didn't drop anything. This was different from any of our runs but probably due to our lack of THF.
3. Also, from the SS from the LBC fight, it seemed that a lot more people still didn't have their 'visible' gears equipped than our last fight. I'm thinking that was due to two things: we got fewer cells to drop overall and our cell lotting wasn't as well-controlled as it was last time. I mostly blame the lack of THF main for the first.
=========================================
http://kanican.livejournal.com/4752.html
Strategy
I have posted the source material for this summary in my LJ here: Salvage - Bhaflau Remnants - LBC Defeated. This link contains a lot of detail that I didn't put into this post.
1. On 1st Floor, used West Route.
2. Farmed Bifrons first for weapons and then wamouracampa for armor slots.
3. Pulled Trolls for weapons and HP
4. Pulled wandering wamoura for magic and JAs.
5. Returned to wamouracampas for more armor slots.
We did not attempt mad bomber or any other NMs on this floor.
6. On 2nd Floor, pulled all four flans.
7. Went East to scorpions and the troll ironworker (I think we went south east, but I can't be sure -edited 12/27)
We did not attempt any NMs on this floor.
** Please note this before porting up: (added 12/27)
<TABLE cellSpacing=1 cellPadding=3 width="90%" align=center border=0><TBODY><TR><TD>Gwynplaine wrote:</TD></TR><TR><TD class=quote>In order to get to the black pudding room on floor 3 I think you need to take one of the south teleports from floor 2. Pudding room is at H-9 so its only accessible from the south.</TD></TR></TBODY></TABLE>
8. On 3rd Floor, invised to the big room at H9 with Black Pudding. Killed them all for more magic, HP, weapon, and max MP cells.
We did not attempt any NMs on this floor.
9. On 4th Floor, buffed and chilled while one person went to activate the teleporter.
We did not attempt anything on this floor.
10. LBC Floor.
-----------------------------------------------
# Party Setup
Party 1: BRD , BLM , WHM , BLM , SAM/THF , BLM
Party 2: WHM , RDM , PLD/NIN , NIN
Party 3: WHM , RDM , MNK , RNG , BL
-----------------------------------------------
# LBC Fight
PLD to his left, NIN to his right.
BRD and SAM only come close when they need to.
RNG is behind them standing on the platform.
Everyone else is standing near the Gilded Doors.
1. Stun works against Homing Missile. Have rotation set up like at Cerberus.
2. Try to save those r/e/t items like dusty and those stat drinks for LBC. They come in handy since they don't have any med effect.
3. I think everyone had max HP, body, hands, legs, feet, and weapon (even the mages). Magic-users and NINs all had Magic, max MP. Melees/Tanks had sub job and JAs.
SAM average melee hit was 53.
RNG ranged attacks average around 60-80 and critical up to 120.
PLD and NIN melee attacks were negligable (averaged around 15-25).
====================================================
Did a run last night, not sure if any of it would be helpful to anyone but I'll give a rundown for example's sake.
Took West path first, killing bombs first for weapons. Some advice... we had two thieves this time around, and we were getting 2-3 weapon drops per bomb. TH rocks the place. This meant that we were fully weaponed after only a couple of bombs, and took out the rest of the floor way faster.
Took out wamouras for armor, as many as we could kill quickly on the way, and then did some trolls and flyers for magic, abilities, and subs. On these you'll probably get more weapons; because of how many were dropping, we were down to giving our mages staves at this point.
Second floor, we killed the 4 Flans, then rushed out the East exit and went south. Killed room with 6 scorps and 2 trolls for a ton of stat boosters, then did a couple more scorpions in the next room while I rushed for the teleporter.
Third floor, we killed a couple of the Flans, and then I ran ahead to the teleporter while the group kept killing. They took down 2-3 more by the time I got there, and by then everyone that could use magic had it.
This is where I may have made a mistake. On the 4th floor, we only killed 1 Archaic Gear and 2 Archaic Gears (the triple gears). I'd heard that these weaken the boss. At this point, being a NIN, I 25%'d my ass past the Archaic Chariot and his gear friends, who chased me and did not warp. I saw earlier that someone with a Bhaflau card approached some and they warped; I had one, and everything I agroed on the 3rd floor warped on me. You need to act on it before it agros, basically. On the 4th floor, however, stuff chased me. Funny thing though, I had only Sneak on, and the gear that agroed me didn't do so until I had passed it and almost gone north into the next room. Either it's a very delayed true-sound agro, or it's some kind of sight agro, or something else entirely. In any case, I outran the whole mess while my group took out one more (single) gear and recovered. We didn't kill any of the Archaic Chariots.
5th floor, we engaged the boss with groups as follows:
PLD/NIN NIN WHM RDM BRD BLM
SAM/RNG RNG DRG THF
MNK WAR DRK BLM THF
So we went in with 16 people. All I can say is, the thing is brutal. My initial thought was to kite, but the PLD didn't have 12%, and it was 8:00 game time so we didn't have time to wait for night for me to kite. We tried having the RNG and SAM/RNG peck away at it while BLMs nuked lightly and the THFs sata'd back and forth. TA+WS was doing Jorm-type damage, and not sticking much hate on us. We stunned a couple of Homing Missiles, but he also resisted a lot of stuns, and the BLMs got too much hate to nuke much. We got it to 84% before he went nuts with the Homing Missile spam.
One thing, people have probably noticed it, Homing Missile doesn't appear to kill. One left two members of the alliance at 1 and 4 hp, respectively. When people had less HP, it did less damage. Highest one I got hit with did over 900, lowest was under 400. Also, his regular hits were very, very erratic, anywhere from 120 to crits close to 500. I didn't notice any difference between side-arm tanking him and straight-on tanking in terms of damage taken. Crits on mages were close to 900.
As for melee, toward the end when we didn't really have much chance left I tried with katanas, and was doing 10-20 with crits in the 40 range. Sidewinders were doing 200-400. SAM 2hr did 3 Sidewinders for 600 total. He did it for fun from 100%, and I Mijin'd for another 200, and that all totaled took him down to 97%. So 800 damage = about 3% in terms of his max HP. Chi Blast was doing good damage, but the hate-holding potential wasn't there with just a PLD/NIN and NIN. Could be easier if we did more than 2-3 voke/flash rounds next time.
In truth, we could have held him all day, but we only had about 20 minutes. We could have fought him Ultima-style but we didn't have enough TA action to keep hate, since the regular THF SATA was doing 150-200 tops. Next time we'll probably bring a couple of SAM/THF and set up some fat skillchains for MB. Biggest constraint I can see, though, is the time. In 10 minutes of trying different methods, and evenutally trying 2hrs, we only took him down to 84%. Our ranged attacks were feeding him way too much TP, and he had already used 4-5 ws's by 95%. I'm not sure how well kiting would work, but since it's been confirmed you can outrun Homing Missile, timing it so your last 30 minutes were during nighttime might let a NIN kite efficiently. But then I don't know if enough damage could be done in the time allotted.
In any case, it was too hard for us to beat on our first try. We'll be trying again soon, and if anyone has any more input/questions about specifics, please ask.
There really has to be SOME way to weaken him, because as it is he's extremely hard to kill. I'm hoping we can confirm something soon.
=========================================================================
________________________________________________________________
# Cell Drop List
-- Enter 1st Floor @ 09:01 --
@ Bifrons 09:04 (H-10)
Incus (Weapon)
@ Bifrons 09:05 (G-9)
Incus (Weapon), Duplicatus (SJ), 2x Spissatus (MP)
@ Bifrons 09:07 (G-9)
Incus (Weapon), 2x Duplicatus (SJ), 2x Humilus (HP)
@ Bifrons 09:10 (G-8)
Duplicatus (SJ), Spissatus (MP)
@ Troll Lapardist 09:12 (G-7, four wall room)
no drops
@ Bifrons 09:13 (G-7, big room)
2x Humilus (HP)
@ Troll Lapardist 09:12 (G-7, big room)
no drops
@ Bifrons 09:16 (G-7, big room)
Incus (Weapon), Duplicatus (SJ), 2x Humilus (HP)
@ W.Wamoura 09:18 (H-8)
2x Opacus (JA), Praecipitatio (Magic)
@ W.Wamoura 09:21 (H-8)
Opacus (JA), Praecipitatio (Magic)
@ W.Wamoura 09:22 (H-8)
3x Opacus (JA), Praecipitatio (Magic)
@ Troll Ironworker 09:24 (H-8)
Duplicatus (SJ)
@ Troll Ironworker 09:25 (H-8)
2x Humilus (HP)
@ Wamouracampa 09:27 (G-7, big room)
3x Stratus (Leg/Feet), 3x CirroCumulus (Back/Waist), 2 Virga (Ear/Ring)
@ Wamouracampa 09:28 (G-7, big room)
3x Castellanus (Head/Neck), 3x Cumulus (Body), 2x Undulatus (Ranged/Ammo)
@ Wamouracampa 09:30 (G-7, big room)
3x Castellanus (Head/Neck), Virga (Ear/Ring), 3x Radiatus (Hand)
@ Wamouracampa 09:32 (G-7, big room)
2x Undulatus (Ranged/Ammo), Castellanus (Head/Neck), 3x Stratus (Leg/Feet)
@ Wamouracampa 09:32 (G-7, big room)
2x Stratus (Leg/Feet), 4x Castellanus (Head/Neck)
@ Wamouracampa 09:33 (G-7, big room)
3x CirroCumulus (Back/Waist), 3x Virga (Ear/Ring), 2x Stratus (Leg/Feet)
@ Wamouracampa 09:35 (G-7, four wall room)
3x Castellanus (Head/Neck), 2x Virga (Ear/Ring), 3x CirroCumulus (Back/Waist)
@ Wamouracampa 09:36 (G-7, four wall room)
3x CirroCumulus (Back/Waist), 2x Undulatus (Ranged/Ammo), Cumulus (Body)
@ Wamouracampa 09:37 (G-7, four wall room)
2x Virga (Ear/Ring), 6x Stratus (Leg/Feet)
-- Port to 2nd Floor @ 09:38 --
@ E.Flan 09:40 (H-8/H-9 Ring)
Praecipitatio (Magic), Opacus (JA)
@ E.Flan 09:41 (H-8/H-9 Ring)
Praecipitatio (Magic), Opacus (JA)
@ E.Flan 09:43 (H-8/H-9 Ring)
Praecipitatio (Magic), 2x Opacus (JA)
@ E.Flan 09:44 (H-8/H-9 Ring)
Praecipitatio (Magic), 2x Opacus (JA)
@ Flux Flan 09:48 (I-9, NorthEast corner room, Socket)
** Traded Spissatus, Got 2x Spissatus (MP)
@ Troll Smelter 09:49 (I-9, room in center)
Humilus (HP), 2x Mediocris (CHR)
@ Sulfur Scorpion 09:51 (I-9, room in center)
3x Pannus (STR)
@ Sulfur Scorpion 09:52 (I-9, room in center)
3x Mediocris (CHR), Pannus (STR)
@ Sulfur Scorpion 09:53 (I-9, room in center)
Pannus (STR), 2x Pileus (MND)
@ Sulfur Scorpion 09:56 (I-9, room in center)
2x Pileus (MND), Humilus (HP)
@ Sulfur Scorpion 09:56 (I-9, room in center)
2x Pannus (STR), Incus (Weapon)
@ Sulfur Scorpion 09:57 (I-10)
Incus (Weapon), 3x Radiatus (Hand)
@ Sulfur Scorpion 09:58 (I-10)
Incus (Weapon), 3x Virga (Ear/Ring)
-- Port to 3rd Floor @ 10:00 --
@ Black Pudding 10:04 (H-9)
Humilus (HP), 3x Undulatus (Ranged/Ammo)
@ Black Pudding 10:04 (H-9)
Praecipitatio (Magic), Spissatus (MP)
@ Black Pudding 10:07 (H-9)
2x Humilus (HP), 2x Duplicatus (SJ)
@ Black Pudding 10:07 (H-9)
2x Praecipitatio (Magic), Spissatus (MP)
** One of us ran to the porter at J-9 to port us up.
-- Port to 4th Floor @ 10:09 --
-- Port to 5th Floor @ 10:15 --
________________________________________________________________
# Comments about our LBC fight
Hevada used an Oracle's Drink and his damage was significantly higher than anything else including the other BLMs. Note: He also had INT stat encumbrance since we couldn't get any Velum cells to drop at all in this run. Once he KO'd and RR'd, his damage output reflected his encumbered status.
PLD used Body Boost.
NIN used Body Boost.
RNG was doing his normal damage just like last time.
MNK chi-blast doing less than last time. I wonder if he even used the MND item. (He's not our usual galka MNK unfortuntely.)
Stun. We rarely used it this time. Also, LBC did not spam Homing Missile.
Healers. Please bring some raven/crow for casting cures after Homing Missile.
________________________________________________________________
# Observations
1. The drops were different from our last few runs. They included way too many STR cells and no INT cells at all even though we went the exact same route as before. This is what, ultimately, lead to our running out of time against LBC.
2. There were a few mobs that didn't drop anything. This was different from any of our runs but probably due to our lack of THF.
3. Also, from the SS from the LBC fight, it seemed that a lot more people still didn't have their 'visible' gears equipped than our last fight. I'm thinking that was due to two things: we got fewer cells to drop overall and our cell lotting wasn't as well-controlled as it was last time. I mostly blame the lack of THF main for the first.
=========================================
http://kanican.livejournal.com/4752.html
Last edited: